Thursday, September 25, 2008

New Tools from An Unexpected Source


Well, there will be a baking hiatus this weekend but I happened to find my next inspiration at an unusual place: Target! I found these two small spatulas- perfect for cupcakes! and then I found something that I had only dreamed of...small cake pans!! I can't wait to make a mini-layer cake. And finally, I found culinary lavender which I am also excited to use. McCormick came out with it but I have not seen it in stores on the West Coast. Draeger's however has some.

So look forward to some mini-layer cakes, lavender baked goods and still St. Nicolas cookies to come.

Sunday, September 21, 2008

The Most Beautiful Cupcakes I Have Ever Made!


Well, here they are...the most beautiful cupcakes I have ever made.

1. Did they take forever? Yes. Two days.
2. Were they as easy as the cookbook described? No.
3. Did I use unladylike words at certain moments when things did not go as planned? Yes. ( I frightened our dog, Beaker, at one point)
4. Were they worth it? Absolutely!!!

In fact, this inspired some future new baking endeavors that will be coming soon!


So, how did I make them? Here is the evolution from finish to start.


Actually the hardest part was the last, putting the butterflies on the cupcakes. For some reason, the book said all you needed was two brown M&Ms to support the butterflies such that the wings were tilted. It was a lie and I just couldn't get those wings to tilt without falling off. I broke one wing in the process- (cue the unladylike words).


I bought 14 oz of M&Ms in order to get those brown M&Ms. How many brown ones did I find: About 12. How many did I really need? About 60. Remember when there were two colors of brown M&Ms? Well, the blue has taken over. So, I switched to yellow- which coincidentally is the second least common color in my bag. (cue unladylike words)


The antennae were also tricky but I anticipated this and made a lot of them. I broke quite a few but still had enough.

Actually I loved working with the candy melts for the antennae and butterflies. While they aren't super high quality, I discovered that it is easy to write shapes and initials with them and they harden very quickly. I will definitely be exploring these for future decorations!


I modified the butterfly pattern to be a bit more swirly ( see above) and not quite as pointed as the book recommended (see photo below).

When I made the butterflies with the points, the texture wasn't as pretty. I piped the chocolate melts first and filled with the orange. But the chocolate melts were already hardened and that made it difficult to pull through (again, unladylike words). Then I started piping both chocolate wings, filling with the orange and then microwaving it for 5 seconds to get things melting again to pull or swirl. This took a long time.

I traced the butterfly pattern from the book and put waxed paper over the top.

You can see these butterflies emerged from simple candy melts.

And this was the initial inspiration! In fact, I bought the cookbook, Hello Cupcake, solely for this recipe. They have a blog and a neat website with cupcake challenges!

So that's it! Again, my inner Martha is totally satisfied even though I still have to clean the kitchen...

Thursday, September 18, 2008

These Aren't Really for the Birds!

Well, here they are: the birdhouse cookies. I was anxious to make these cookies because I recently bought the cookie cutter and couldn't wait to try it. I immediately thought of the brightly colored designs of Mary Engelbreit as inspiration for the frosting.

I actually went all out on these cookies: baking them the night before so I could really focus on the frosting, making 5 colors of frosting, and making two different consistencies of frosting- outline and flood. Here's a bit more on my sugar cookie baking strategy.

The basic ingredients of my royal icing are water, vanilla, powdered sugar and meringue powder. The recipes are from the Sugarbaker's Cookie Cutter Cookbook which is out of print and I bought used on Amazon. It was pricey but worth it.
I don't usually use raw egg whites because some people shouldn't eat them for food safety reasons (i.e. pregnant women and young children and salmonella risks). The difference between flood and outline consistency is the proportion of water to the powdered sugar and meringue powder. Outline is thicker and is used for piped borders and designs. Flood consistency is a flowable icing that will spread willingly without using a knife to spread. Sometimes I will use base consistency which is in between and then pipe outline frosting onto that...but I was going all out tonight!

So I piped some designs in white outline frosting to start...


and then flooded the cookies with the colored frosting in flood consistency. I actually only used one pastry bag and I used bowls and toothpicks to guide the flood frosting across the cookies and into the piped areas. I then piped more outline frosting on top as you sometimes visually lose your borders in the flooding. It was also great to add little dots and touches. I also used several colors of sanding sugar- which is a fine sugar that adds a beautiful sparkle.


I also varied the color by mixing in white frosting into the remants of the colors as I used up the darker colors...This gave me lighter shades to work with without using another bowl and spoon. Here's a shot of all of the finished cookies...note the pink blackberry in the middle of the chaos.


I have a hard time making the same cookie twice and I love to try out new designs each time.


This is why I have to be a cookie designer not a cookie baker...I love the creative part, not the repetition of the same patterns.

And this was the final chaos that was and still is my kitchen. I think the final tally was about 26 cookies, 5 sanding sugars, 5 frosting colors (red, blue, yellow, white and green), a ton of toothpicks, a lot of dirty dishes and one happy cookie baker!


Thanks for indulging me on my incredibly messy baking adventures...and reading this blog.

Tuesday, September 16, 2008

Putting My Heart Into It...

Of all of the things to bake, I love


love

love


love

love to bake and decorate sugar cookies.

I especially like to pipe the frosting but these hearts have two delicious sugars on them instead: lavender ginger sugar and lemon rosebud sugar.


You can really appreciate the flavor of the cookies. I also used King Arthur flour for the very first time. Has anyone used this flour before? They offer several specialty flours as well.

Too bad I don't love love love love to do the dishes. There is a magnificent mess in my kitchen right now.

Saturday, September 13, 2008

A Tale of Two Turnovers


Turnover number one


Turnover number two

Finally, I made a recipe from the Little House on the Prairie Cookbook: apple turnovers. If you have read the book, you'll remember that Laura's husband, Almanzo, had delicious apple turnovers in his lunch pail everyday. Mother Wilder was an excellent cook and baker and the Farmer Boy book is practically all about the food the Wilder family cooked and ate.

So, I decided to try my hand at apple turnovers. I made one major modification to the recipe: I used butter instead of lard. We didn't have any lard in the house and I typically use butter in my crust. I made the dough by hand (instead of the food processor) and only with butter, flour, salt and ice water as prescribed. My traditional pate brisee recipe has a bit of sugar in it but that would have been extravagant for the time as white sugar was more expensive and harder to come by. The dough was not sweet as a result.


I peeled and chopped the apples and added brown sugar and cinnamon. The dough was rolled out and the apples placed in the center.


Here's where it got tricky. The recipe recommended too much filling and I struggled with getting adequate filling inside and a completely tight seal. I confess, I had some leaks. I also added a few dots of butter to the filling to help with the yum factor.


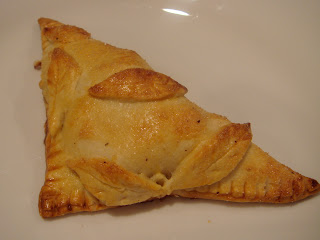
In the spirit of the book, I made one turnover according to the recipe, with a simple crust.


The pioneer recipe recommends dusting the turnovers with powdered sugar and you can see that greatly improved the visual appeal and flavor.

Then I made another turnover using a few of my own tricks: an egg wash, a few decorative leaves, and a sprinkling of white sugar. Being a lover of decorative pie crusts, I thought the egg wash and whitesugar topping was also very pretty on my second turnover.


And I had enough leftovers to scrap together an apple tart with a bit of lemon curd.

So, how did they taste? Pretty good! They didn't have as many "brown, spicy juices" as Mother Wilder's but they were very tasty and I could easily imagine these in a lunch pail. I also have a greater respect for baking during that time. Imagining the availability of ingredients that we take for granted like white sugar and apples, the challenge of using a woodburning stove instead of an oven, and doing everything by hand without Kitchen Aid mixers or Cuisinart food processors, these women truly were accomplished and dedicated cooks and bakers and I applaud them.

Sunday, September 7, 2008

Let Them Eat Gluten-Free Cake!


Well, before I could make anything from the Little House cookbook, I had to make my very first gluten-free chocolate birthday cake for my brother- who is sensitive to wheat and cannot eat it.

First, I did some reconnaissance on the internet because I wanted a chocolate cake recipe that was more like a traditional cake and not a dense, flourless chocolate cake. I found a one-bowl recipe that needed two special ingredients from Whole Foods:

1) a gluten-free flour blend made of potato starch, white rice flour, brown rice flour, amaranth flour, quinoa flour, white cornmeal, garbanzo bean flour, and soy flour.

2) xanthan gum is a thickener and a binder that comes from a bacterial fermentation. It has some unique properties that affect the viscosity or thickness of food and is widely used in salad dressing. In salad dressings, xanthan gum thickens the dressing so that particulates become suspended but thins when shaken or stirred so it will pour out. When it is on the salad, the dressing stays coated on the lettuce. Xanthan gum is used in gluten-free baking because it provides some binding and thickening that wheat flour would otherwise provide. Ultimately, xanthan gum improves the texture of gluten-free baked goods. I was familiar with this ingredient as a food scientist but was surprised to find it at Whole Foods.


I mixed up the batter and found the thickness of batter to be much like the salad dressing description: flowing when stirred but thick and a bit globby upon standing - very different from traditional cake batter. It tasted delicious.

This recipe did bake 8 minutes earlier than it originally said (toothpick came out clean), which always makes me a bit nervous. I have a confession, I cut a teeny, tiny piece out of the layer just to triple check. I whipped up the frosting and when it was done...it looked a little more like a giant brownie and a little less than the Martha Stewart vision I had.

With candles it was very festive!

And....it did taste very, very good and had terrific texture! My brother was happy to have a gluten-free cake that didn't taste gluten-free.

Saturday, September 6, 2008

And the winner is...

something from the Little House on the Prairie Cookbook! The people have spoken and that's what I will be making next. However, I did make a gluten-free chocolate cake for my brother's birthday party today. I think that is worth sharing. Has anyone ever made a square layer cake? I just did and it looks a bit like a giant brownie. :(

Photos coming as soon as we eat it tonight.

Monday, September 1, 2008

Happy Birthday, Justin!


For Justin's birthday, I decided to make a checkerboard birthday cake. C.C., A's mom, used to make this cake when we were kids. Justin's birthday was the perfect opportunity to try it out this kit given to me by my friend, C !


Of course I had to start at about 10PM at night. I followed the recipe on the box (see above photo) because I didn't want to take too many chances and I thought the batter viscosity or thickness might be optimized such that the colors didn't run together.

Here are the basics for this cake:

1) Make 2 colors of batter that will go in three cake layer pans. This recipe added melted chocolate to the batter for the chocolate batter but I think food coloring could be really fun as well.

2) Alternate the batters in concentric rings using this special pan:


It was a little challenging to add the batter such that each ring is the same height. I wished there were little height marks. The batter was scoopable and spoonable...not pourable which was also a bit tough but you don't want the colors to run...


The divider has to come out before baking. I tried to lift it as perfectly as possible so as not to disturb the pattern. I also had a chance to smooth the rings.


You can see that you need to make two pans with the same pattern and one that is reversed. I thought they looked okay at this point.


Then I baked them...

and was a bit worried. They were a little domed which is normal but they looked off center!
The undersides were centered though...so I layered them and frosted. Now I actually tried to the level the cakes- without any special equipment. But it was coming up on 2AM and I was pretty tired and sort of forgot to really level the last layer. Here's how it looked:


I used sprinkles and edible green and purple glitter.


Hmm...not so great on the leveling. Perhaps it would be a whimsical, Dr. Seuss-eque cake. After all who knew what the center would look like.


So we lit the candles and sang "Happy Birthday"...

and Justin made a wish.

and it actually turned out pretty well!

The texture was very old-fashioned: a bit dry and very light. All in all, it was a success!


But I have to add one more photo for fun. About 12 years ago when I first started baking, I made this cake for J using food coloring. It wasn't checkerboard but it turned out really cute! I should try checkerboard with some colors! Yes, that is me with the really dark hair, my natural color!