Sunday, November 30, 2008

Finding Good Pie Karma for Thanksgiving

We hosted this year's Thankgiving dinner for twelve. For details about the dinner, go to Foodspiration. Well, I have a pie confession: I had some pie problems this year and I'm really not sure why except that I tried two new recipes and I suspect they were the culprits.

Pie #1: Pumpkin

Okay, how hard could this be? I have made pumpkin pie many times and this year I was following the Pies and Tarts Williams-Sonoma recipe. First, the crust slumped terribly.

This was the pre-baked crust.

And this was the post. Has this happened to you? Any suggestions? I followed the recipe to the tee and didn't even cheat on the chill time. Arrgh!

Then, I made the filling which seemed unusually thin- it only had 1 cup of pumpkin and over a cup of cream- and the color was more yellow than orange which I suspected due to the lack of pumpkin. It would not set up...it baked over 20 min longer which really darkened the crust (I just bought a pie shield to help with this). I was so frustrated. I looked up other pumpkin pie recipes and decided that yes, there wasn't enough pumpkin. Even the W-S website had a different pumpkin recipe that had more pumpkin and seemed more reasonable.


So, I did what any Martha-loving person would do. I tossed that pie and went back to my Martha's pate brisee crust and maple pumpkin recipe. And it baked exactly as it should. We even foamed the whipped cream in the ISI whipper.

Phew...I had found my pie karma.


Tart #2 Caramel Cranberry Almond

This was also from the Williams-Sonoma pie and tart book and it was a beautiful tart. The trouble was that the cranberries were so sour and the caramel just wasn't enough to balance them...so it was a tart tart.

I essentially caramelized sugar and added cream...

and stirred in the cranberries and almonds...

which was so beautiful...

and baked 4 small tarts...

one large tart...


Was it a bad batch of cranberries? Does the recipe need more sweetness? I did sneak in a few more berries for color but was it enough to put the tart out of balance? Well, everyone ate it but my inner Martha was a bit disappointed. However, they were beautiful and I will just have to make it again and figure it out!

All in all, things were tasty and everything got done in time. Thanks to Dad for taking some of this post's photos!

Coming next, my cheater holiday rolls...

Tuesday, November 25, 2008

And the Thanksgiving pies will be...

...a pumpkin pie and a cranberry caramel tart!

How can we not have pumpkin pie on Thanksgiving? And I have really wanted to try the cranberry caramel tart from the Williams-Sonoma Pies and Tarts book.

This photo from Williams-Sonoma advertising their Emile Henry Pie Plate has inspired me to embellish my pumpkin pie. Don't worry there will be photos. This is a bloggable Thanksgiving with edible bacon salad bowls, two turkey two-ways and more. I've already set the table ( I know, it's only Tuesday) and you can see it on our Foodspiration blog.

Sunday, November 23, 2008

A Tale of Two Pies: Granny Hearts Gruyere and Inverted Pumpkin Pie

There were two pies that I recently wanted to bake. One was a recipe I had heard about and one was a recipe that I wanted to make up. The pies were:

1) Granny Hearts Gruyere: apple pie with a gruyere cheese crust

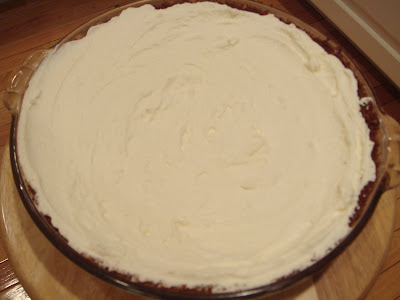
2) Inverted Pumpkin Pie: a cream pie with a whipped pumpkin topping. I have been experimenting with foams and this pie was inspired by deconstructing a pumpkin pie and putting whipped cream as the pie base with a whipped pumpkin topping. The crust was a gingersnap pecan crust. This pie was my first molecular gastronomy inspired dish-more coming soon.

Here's how they went.

Granny Hearts Gruyere

I got the recipe from this website and I couldn't figure out why her pie didn't look very fluted.

I incorporated 56g of grated gruyere cheese in the crust and 20 tbsp of butter!

The crust was actually quite easy to handle and I didn't chill it overnight as recommended.

I made two fall leaves to go on top...

and fluted the pie quite nicely.

I soon discovered why the original baker of this pie didn't have a fluted result. The cheesy crust baked and bubbled and totally lost its fluted shape. It smelled amazing and still looked great.

I used granny smith apples in this and if I did it again, I would add more sugar. It was too tart and the flavors just weren't perfect. Also this pie should probably be eaten warm when the cheese crust is fragrant. We ate it the next day and it was just ok. It was an interesting experiment though! Perhaps the filling needs one more compatible ingredient...hmm.

Inverted Pumpkin Pie

I was much more pleased with the results of this pie.

The gingersnap pecan crust recipe came from this website. It was easy to prepare.

For the whipped cream filling, I stabilized the whipped cream with some hydrated gelatin and added a touch of bourbon and vanilla. I wanted the pie to slice without whipped cream oozing everywhere. It actually worked well.

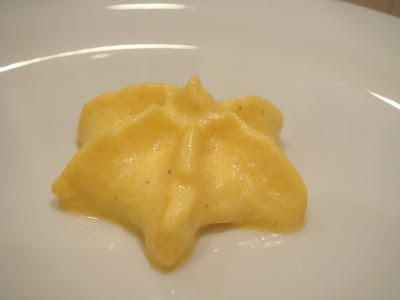
For the whipped pumpkin, I mixed canned pumpkin, cinnamon, nutmeg, allspice and cloves, whipped cream, sweetened condensed milk and maple syrup and heated the ingredients.

I then strained the mixture (the ISI whippers can't handle particulates) and put it in the whipper. I gassed it with two cartridges of nitrous oxide and chilled it.

It tasted great! I am getting to be pretty good at making foams- not a pro but I have learned a few things.

And here is the result. I loved it! However, this was a dessert that needed explanation- without one, you might think it was a cheesecake and be horribly disappointed!

Sunday, November 16, 2008

An Early Birthday Present: Cookies to Come

I received an early birthday present today from my mom and dad that came just in time for the holidays! I have had this on my Amazon wish list for a little while now and what I love about this cookie book is:

1) there's a photo of each cookie
2) the recipes are organized by texture: light and delicate, soft and chewy, crumbly and sandy, chunky and nutty, cakey and tender, crisp and crunchy, rich and dense.
3) there is a visual table of contents - with a small photo of each cookie.

Last year, Martha had a holiday cookie magazine (which I bought, of course) that was this same format but this is obviously an expanded version.

I highly recommend this book as a holiday gift for the foodie, baker, or wanna-be cookie maker in your life ($16.47 feels like a good deal here on Amazon)

Friday, November 14, 2008

A Must for Crust: Three Ways to Beautify Your Pie


Last fall, an article in Martha Stewart Living opened my eyes to the decorative possibilities for pie and pie crust. You can link to the original article here, but I wanted to share my favorite three ways.

The beauty of these tips are that they work on both homemade crust and refrigerated Pillsbury Pie Crust- which is the best cheater crust out there that will fool anyone. It rolls out so there are no creases and you can shape it as you like so it looks homemade as well.

Number One: Sugars and Washes


Before baking...

After baking...

That perfect golden crust that you see in magazines has a secret: it’s a wash. There are several types of washes that you can brush onto your raw pie crust before baking to give it a certain sheen or color. Additionally, sugars, in fine or coarse texture, can give a lovely glittery effect. Here are the 7 different treatments that I have applied to raw pie dough and baked to show the effect:
Each number corresponds to a different treatment. The sugars and washes can be combined as well. Click on the photos for a closer look.

Sugars
1) regular sugar (far left)- traditional sugar gives a fine glittery effect
2) sanding sugar (middle)- these slightly larger crystals catch the light a bit more
3) coarse sugar (far right)- these chunky crystals stand out

Washes
4) water wash- created a slightly different surface but is good to adhere sugars
5) egg wash- for a shiny golden brown crust
6) heavy cream wash- for a brillant sheen without the golden brown
7) egg yolk plus 1 Tbsp of heavy cream – my favorite wash that gives good yellow color and a nice sheen


Number Two: Cut-Out Crusts


When you cut vents in your fruit pies to allow the steam to escape, you can be a bit playful. I have used several different small cookie cutters to create delightful patterns in the top crust. Hearts, stars, florets and others look great. The trick is not to make so many cutouts that the top crust is hard to transfer. Martha even uses small leaf cutters to make an intricate top- she however, partially bakes her top crust to avoid breaking the delicate pattern.
Here is a strawberry pie that I made for Mother’s Day using hearts.


The top crust with cutouts...


And here is a reverse idea of a cut-out crust where I used the cutouts to build the crust. This was painfully slow to do but the effect was lovely.

Stacking the cutouts and "gluing" them with egg wash...

Sprinkled with sanding sugar...

Voila!

Number Three: Decorative Additions


In addition to cutout crusts, you can use your pie scraps to embellish your pie. As with the hearts, I used the cutout as adornments on the pie. Use wash to “glue” the raw cutouts in place on the pie and bake. You may need to use foil to cover any delicate parts of the pie that brown quickly. Don’t have a cutter? It is actually fairly easy to cut a sage-like leaf out by hand using a knife. These leaves make lovely fall additions to pies.


For custard based pies or pumpkin pie or any pie where the filling is liquid and cannot support a top crust, you can bake your adornments separately and add then once the pie is out of the oven. Last year, I baked a ring of fall leaves and crowned my pumpkin pie with them for an elaborate effect. A simpler effect might be to bake 1-3 of these leaves and add them to the pie once it is cooled.


Happy Baking!

Friday, November 7, 2008

My Favorite - Molasses Sugar Cookies

My favorite cookie of all time is a molasses sugar cookie. My grandma makes the best ones and this is her recipe.

So, I pulled out her recipe from my recipe box which is jammed full of family recipes and clippings.

I made one modification to these cookies. I used butter instead of shortening. I think my grandma does this too because her cookies are always round and flat and crispy. When I have used shortening, the cookies haven't spread as much and remained thick. These are much better.

The dough must be chilled because the butter is melted and the dough starts out warm. You must chill it until firm enough to roll into a ball. The dough ball is rolled in sugar and baked until crackly and crisp.

If you could scratch and sniff this photo, you would smell "fall": the mingling of cloves, cinnamon and ginger melded with molasses.

Yum!

Yum!

Yum!

Here's the recipe:

3/4 cup butter               2 cup flour
1 cup sugar                    1/2 tsp cloves
1/4 cup molasses          1/2 tsp ginger
1 egg                              1 tsp cinnamon
2 tsp baking soda          1/2 tsp salt

Preheat the oven to 375F. Melt the butter in a sauce pan. Turn off heat and stir in the sugar and molasses. Transfer to your mixing bowl and beat in the egg until mixed. Sift the dry ingredients and add to the mixture. Chill until firm enough to roll into a ball- this is absolutely important because the dough is "soupy" because it is warm. I tossed the bowl in the fridge and then got impatient and put it in the freezer. 

Once chilled, scoop out and use your hands to roll into ~ 1 inch balls. Roll the ball in white sugar until completely covered. Bake on cookie sheet with a lot of space in between, these cookies really spread, for 8-11 min. I was baking them for 10 + 1 extra min. I was also baking about 7-8/ sheet at a time so they wouldn't touch. When the cookies are done, they are flattened on the sheet- if still puffy, let them bake longer. Remove immediately with a spatula and cool on rack. Cookies will firm as they cool. Enjoy!